Rendering Pixel Art in Real Time
15.03.2026
1 Motivation
I love stylized art styles, and pixel art is a style that I find particularly charming. But making good pixel art is very difficult, especially animated pixel art. So as a graphics programmer, I wanted to see if I could create a rendering pipeline that renders pixel art directly from a 3D scene. I've tried this before in a game jam and it looked pretty cool, but I wanted to see if I could improve the quality and make it more versatile.
Note that this is not some magic tool that can turn any 3D scene into pixel art. It requires a lot of manual tweaking and artistic input to get good results. The results are also a very specific style of pixel art and it is very clear that it is rendered, and not hand drawn. But I think it's a really fun and interesting way to create pixel art, and it allows for some cool effects that would be difficult to achieve with traditional pixel art techniques, such as dynamic lighting and animation.
2 Method Overview
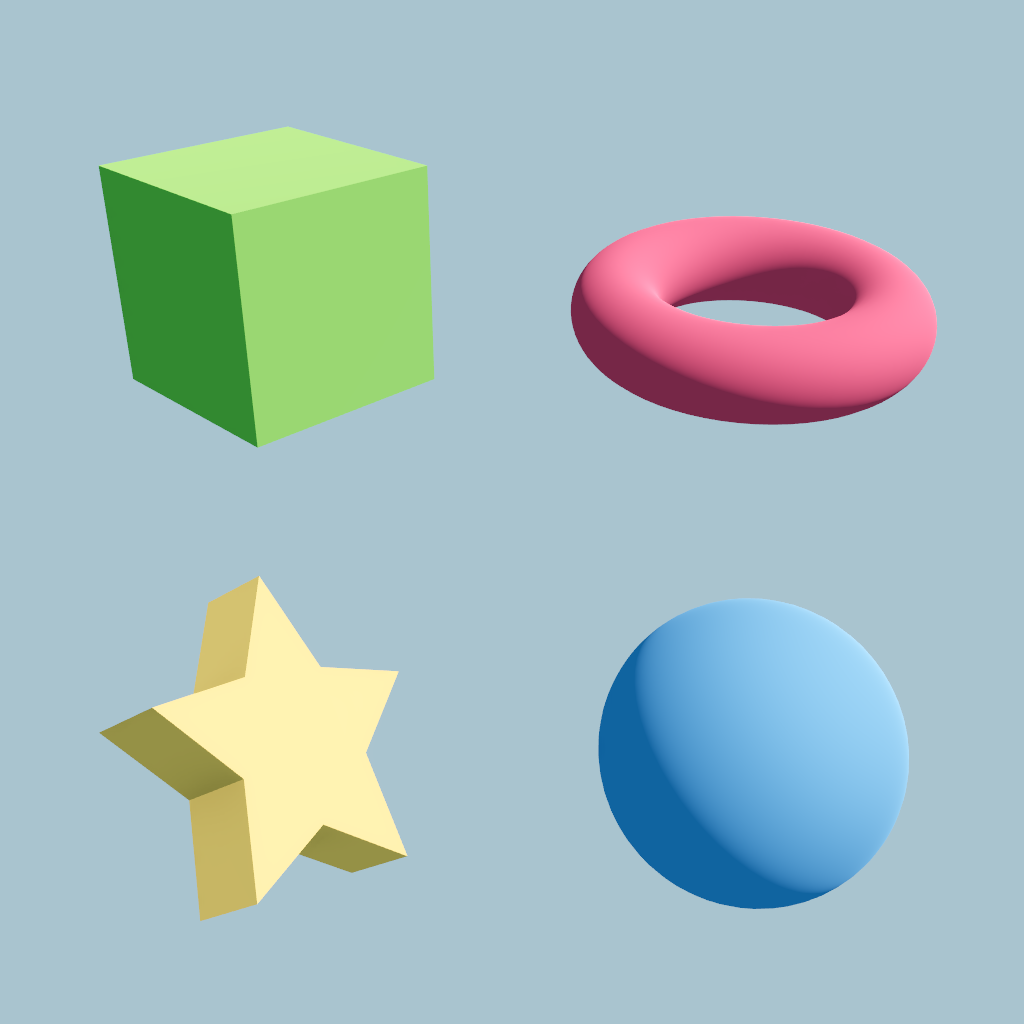
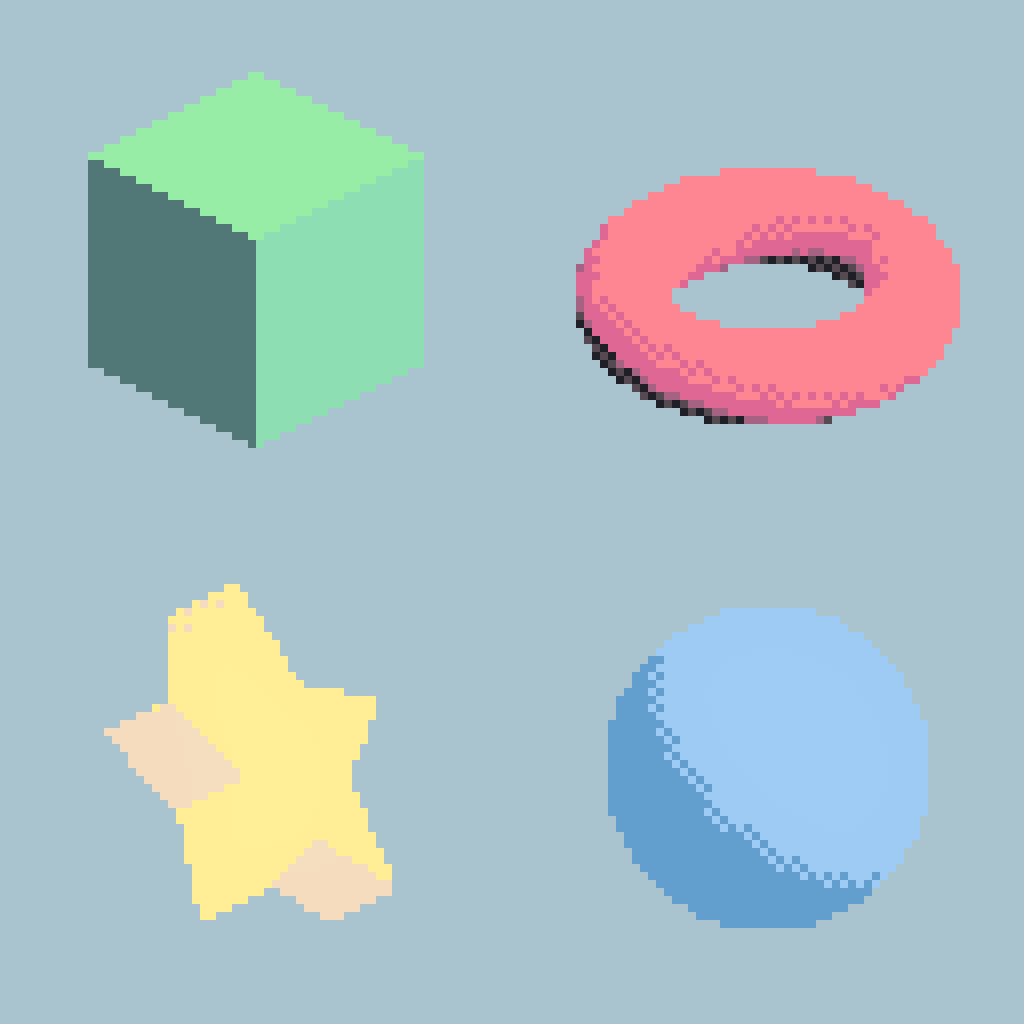
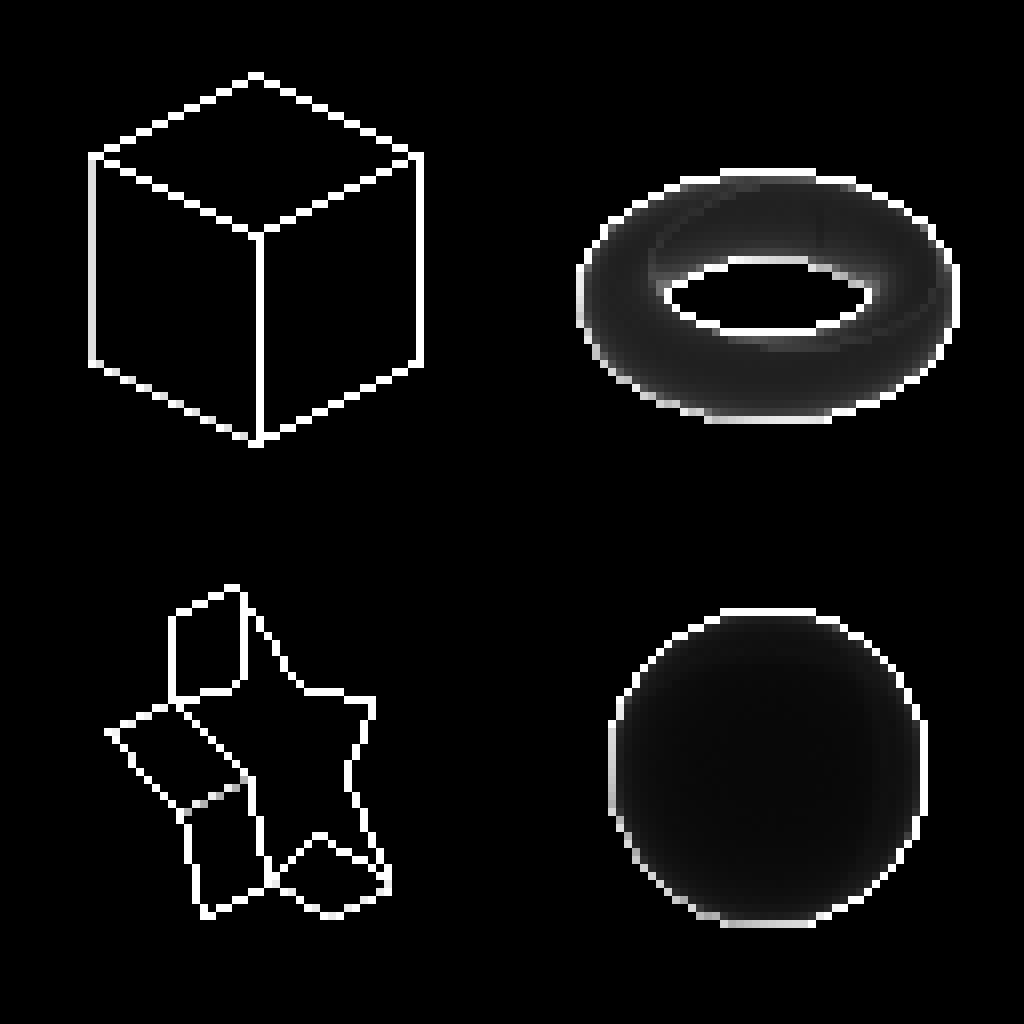
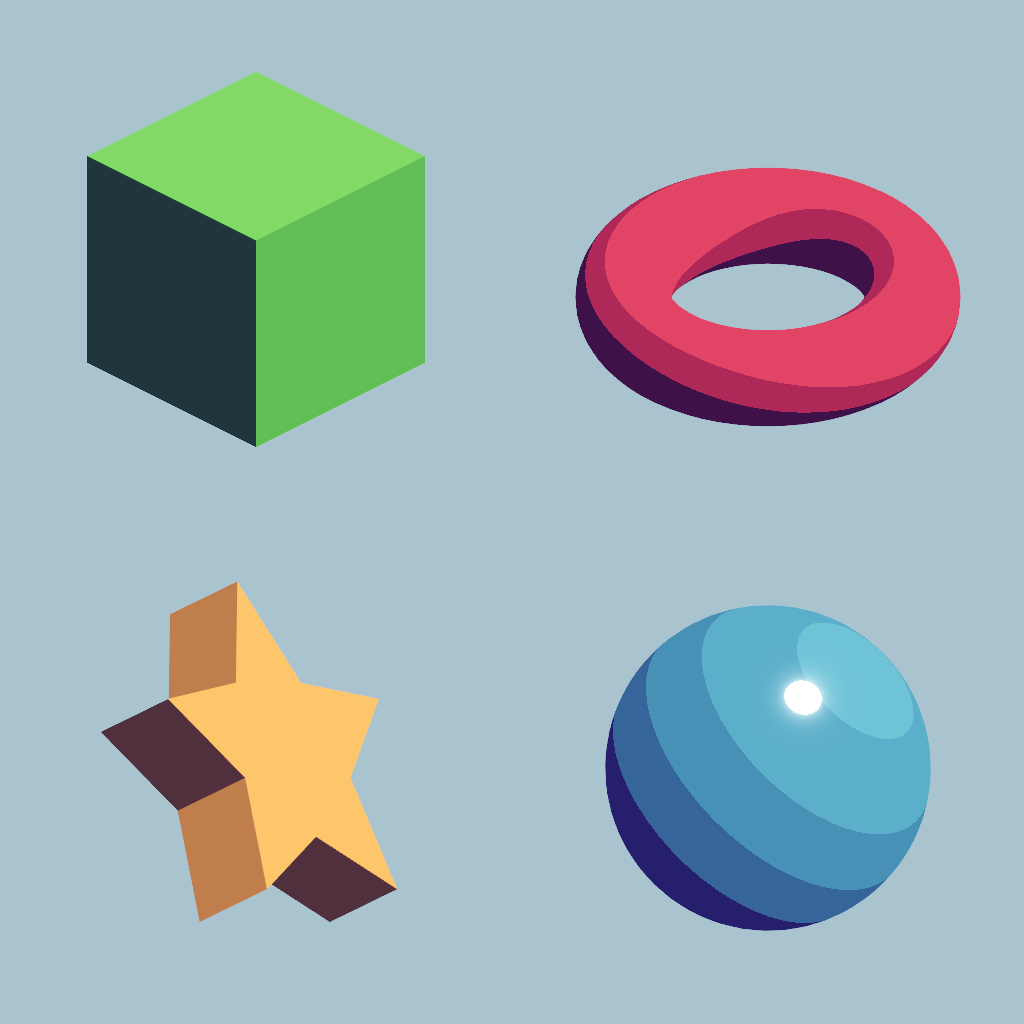
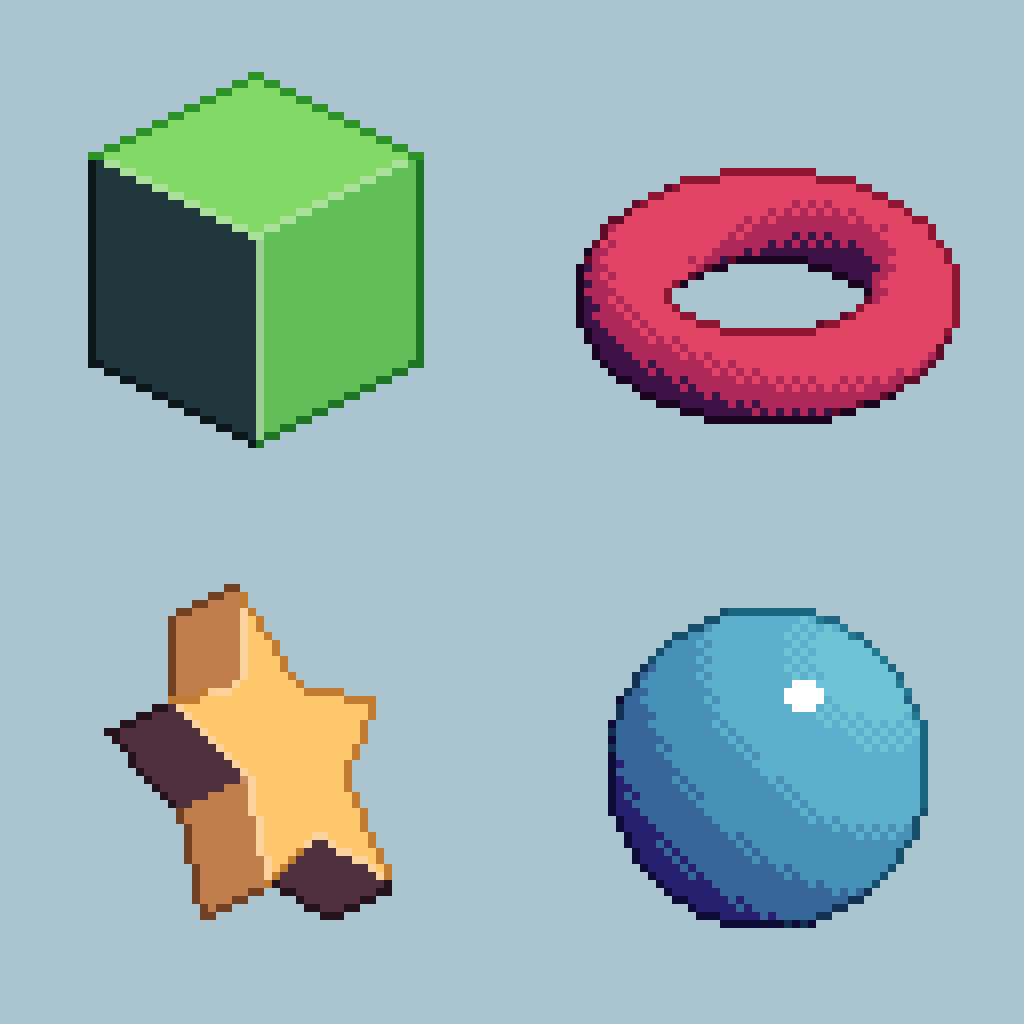
My rendering pipeline consists of several steps, from low resolution rendering to color quantization and dithering. To showcase each step, I've prepared a scene consisting of four simple shapes. If I can make these shapes look like pixel art, then more complex shapes should also be possible. I've included both angular and rounded shapes to explore different shading approaches. I implemented everything in the Godot game engine, but the general approach should be applicable to any rendering engine.
2.1 Low Resolution Rendering
Arguably the most important part of pixel art is the limited resolution. To achieve this, I render the scene at a very low resolution and then scale it up to the screen size using nearest neighbor interpolation. This gives the characteristic blocky look of pixel art.

This provides a good starting point, but it still looks like a pixelated mess right now. Notice how the cube is all wobbly, compared to what you might expect from a pixel art cube.
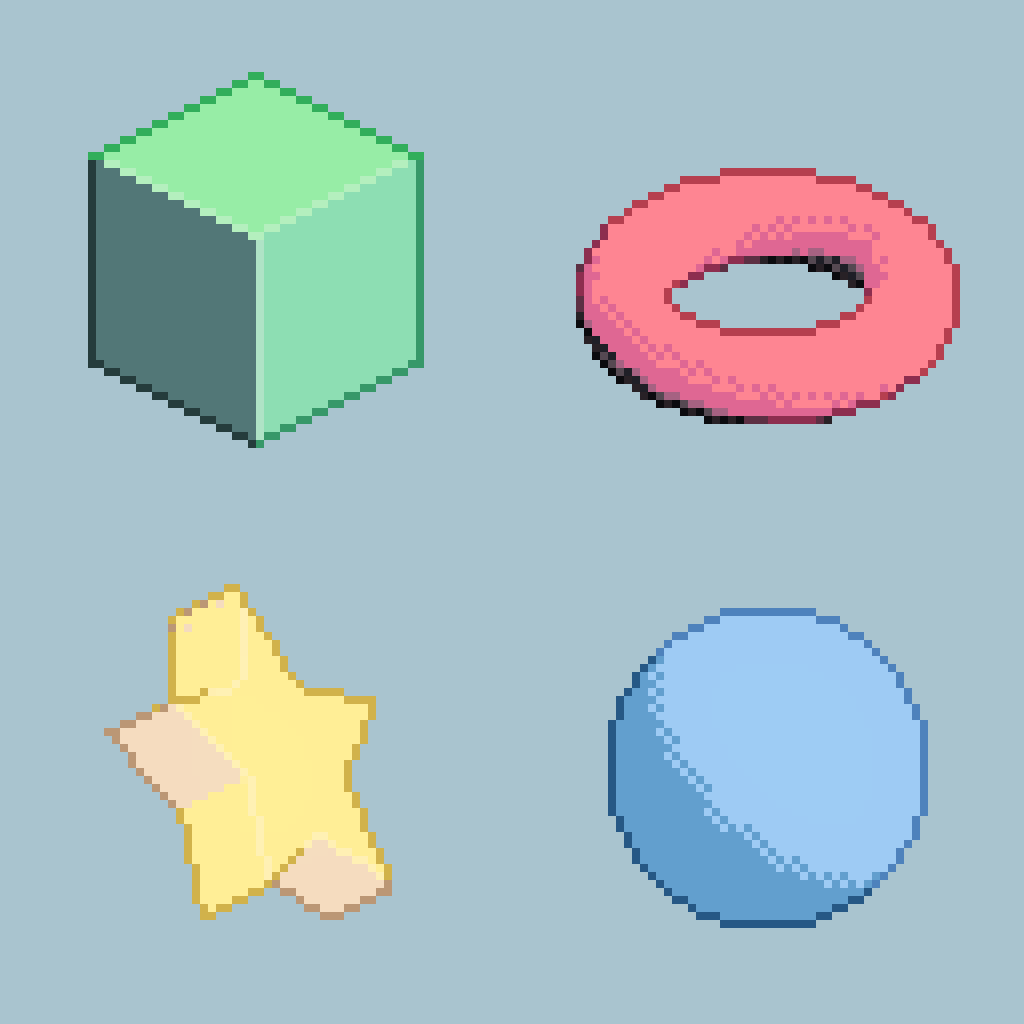
2.2 Orthographic Projection
Most pixel art is drawn in orthographic perspective, which makes parallel lines remain parallel and keeps the scale uniform across the scene. Fortunately, most game engines support orthographic projection. This fixes the wobbly cube that now looks like actual pixel art. The torus also looks more uniform, since depth doesn't affect the scale in orthographic projection, making each part of the torus the same size.
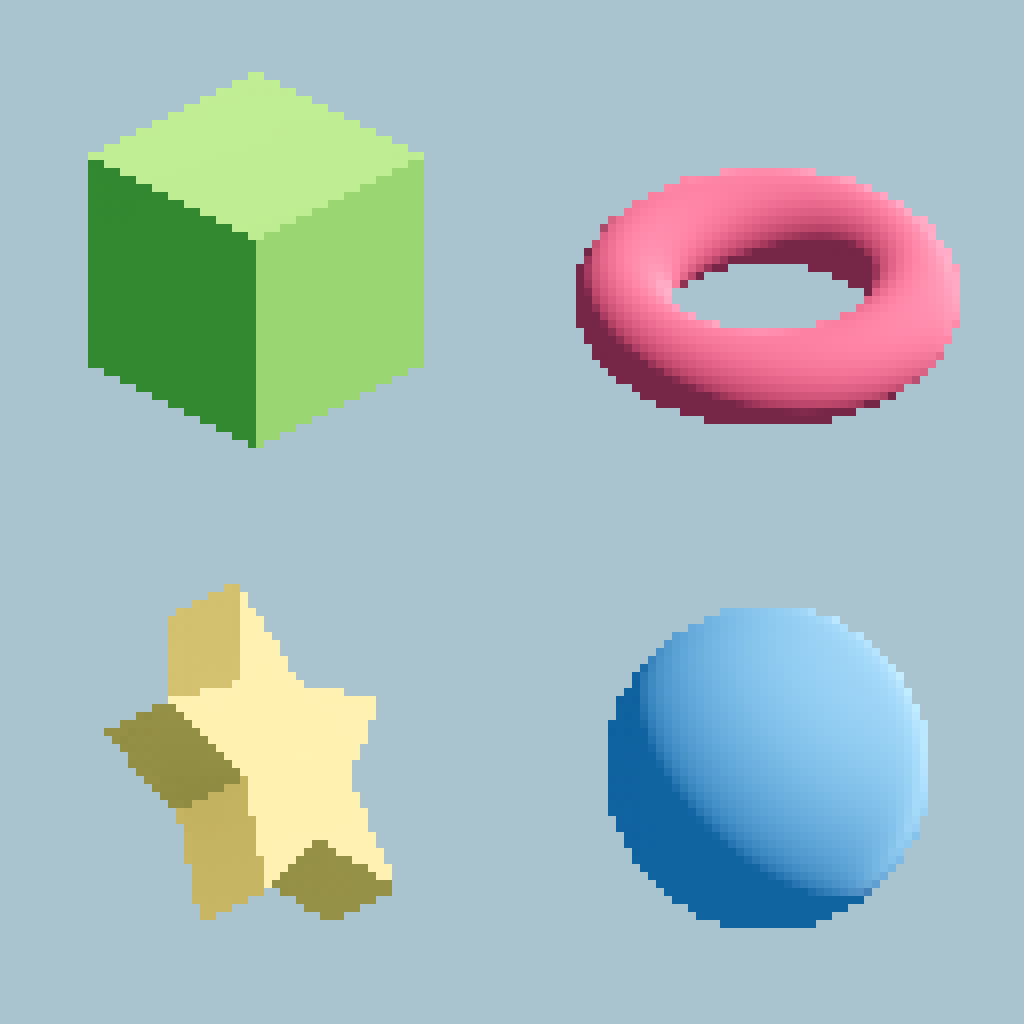
However, especially the rounded shapes still clearly look like a low-res 3D render and not like pixel art.
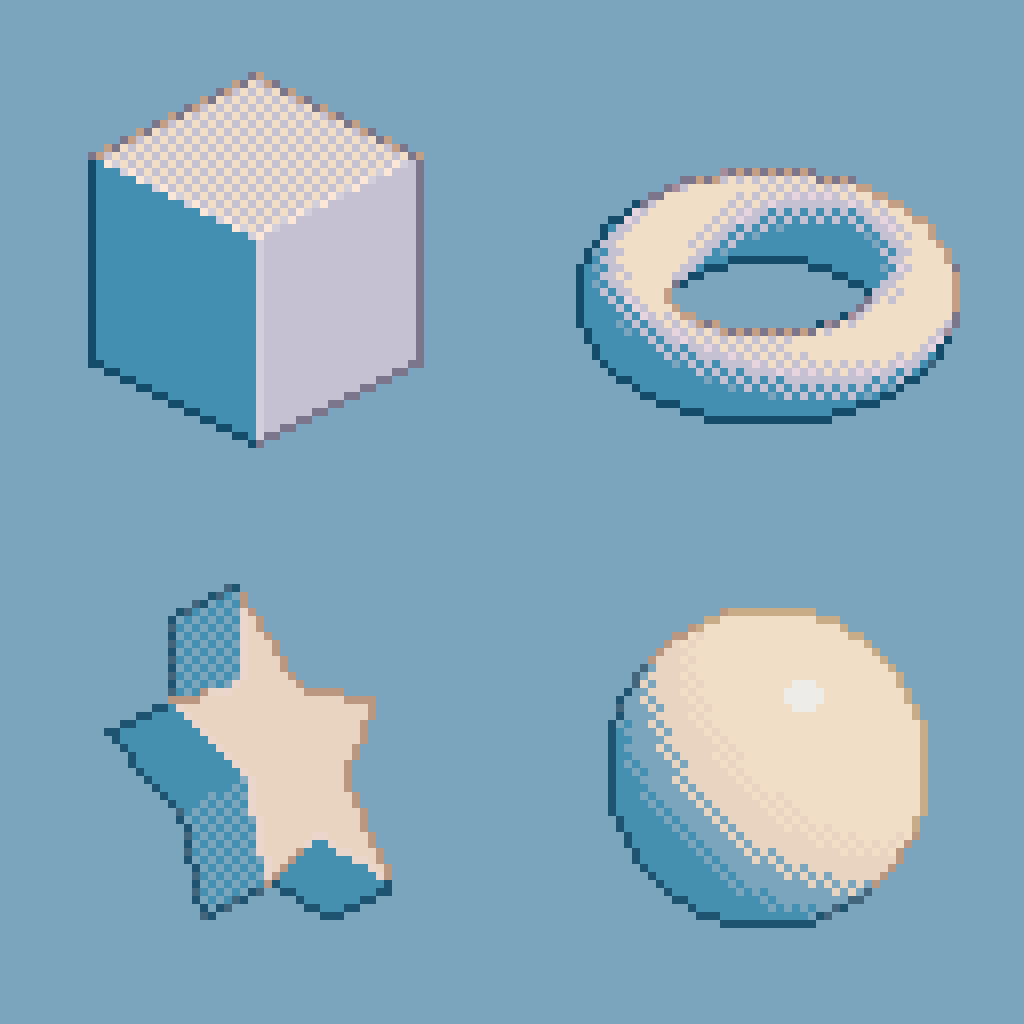
2.3 Posterization
One key component of good pixel art is the color palette. Try this yourself: Look at your favorite pixel art and count the number of unique colors. You should find that it's quite low (<30). Instead of utilizing the full spectrum of colors, pixel artists often only use colors from a predefined color palette. To achieve this in my renderer, I pick the closest color from a given palette for each pixel on the screen, after rendering the scene.
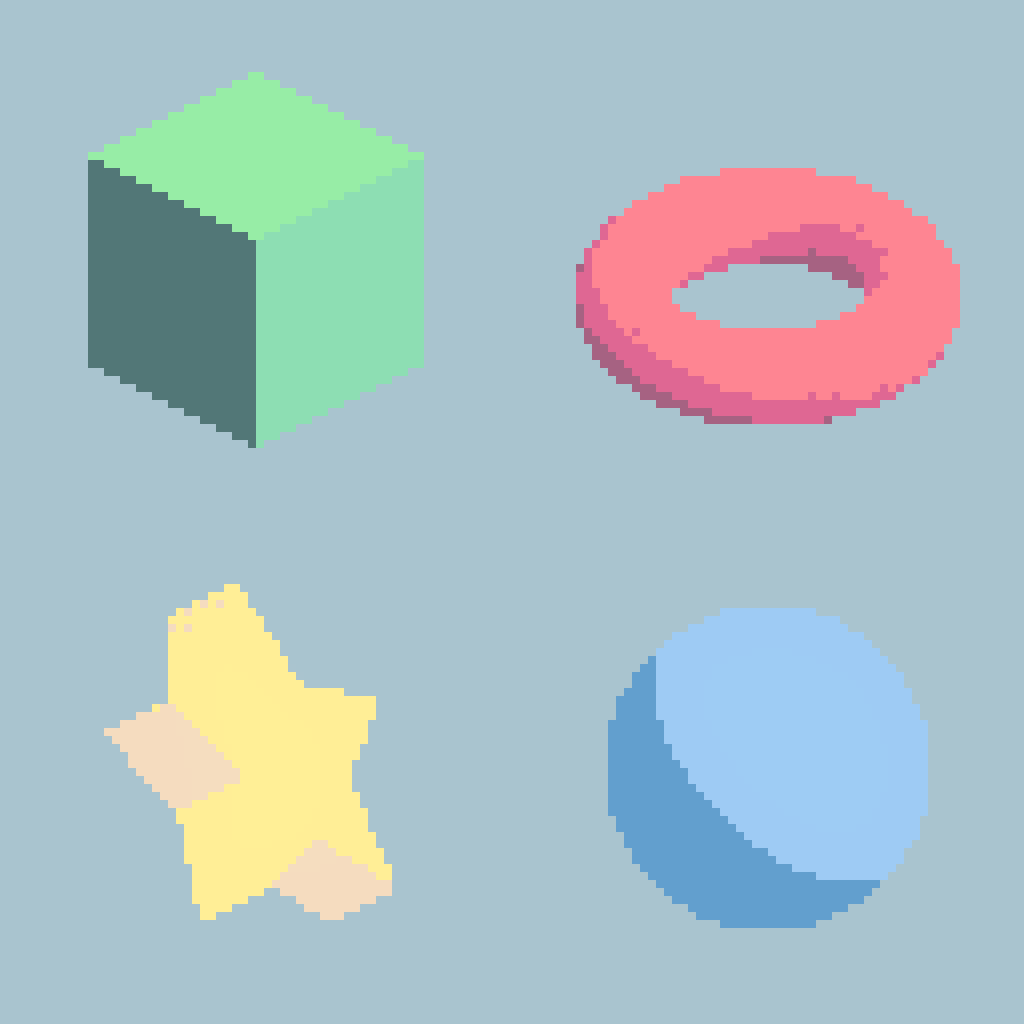
This does reduce the "smeared" 3D render look, but the posterization introduces banding artifacts which are visible on the rounded shapes. Also, since many colors collapse to the same color in the palette, it is difficult so make out some of the shapes, for example the star.
2.4 Dithering
To mitigate the banding artifacts from color posterization, we can use dithering. Dithering adds a small offset to the color value of each pixel before posterization, which helps to break up the banding. With dithering, we can have fairly smooth color gradients which naturally appear on rounded shapes, while still using a limited color palette.
 No dithering
 Dithering
Applying this to the render improves the shading a bit.
The shading on the torus and sphere looks much better now. However, the star is still hard to make out. Also, the sphere color is very similar to the background color (which I didn't run through the color palette), so it doesn't stand out very well.
2.5 Outlines and Highlights
To fix both these issues, I added outlines and highlights. Outlines help to define the shapes and make them stand out from the background, while highlights can add some extra detail inside the shapes. Both require some kind of edge detection, but since I have a 3D scene, I can use additional buffers such as normals and depth to detect edges. More specifically, I first compute the difference in depth and normals between neighboring pixels. Then, if there is a big jump in depth, then it's likely at the edge of a shape, so that pixel gets colored with the outline color. If there is a big jump in normals (but not in depth), then it's likely at an edge between two faces of the same shape, so that pixel gets colored with the highlight color. This is a very simple approach, but it works surprisingly well.
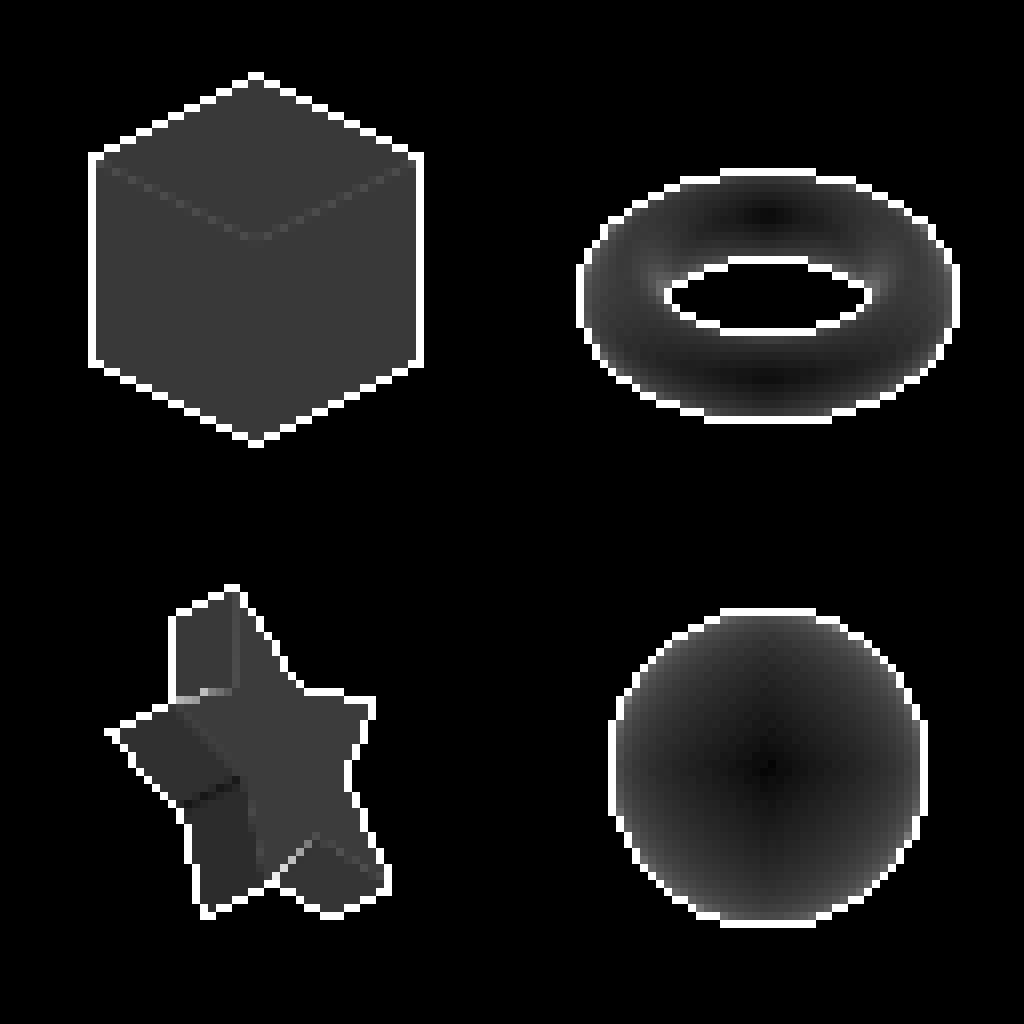 Depth difference
 Normal difference
Applying this to the render makes the shapes much more distinguishable, especially the star.
2.6 Improved Posterization (Cel Shading)
The previous posterization method works fairly well, but the overall shading and colors are hard to control, since everything snaps to the predefined color palette. In some cases this is exactly what you want, e.g. in a scene with consistent lighting where you want heavy stylization.
I personally want more precise control over the individual colors while still maintaining a limited color palette. One approach is to use a different shading model for our meshes.
Cel Shading
Why do we even need posterization? Where do the color gradients come from? Even though I only assign a single color per mesh, the final pixel color is not just determined by the base color of the mesh, but also by the lighting and shading model used to render the object. It depends on the angle towards the light sources, occlusion, viewing angle, etc. This is nice for realistic rendering, but we don't want that here. So instead of rendering it with the default diffuse (+specular) shading model and then posterizing the colors, we can directly "posterize" the lighting values. This is the idea behind cel shading, which is a non-photorealistic shading technique that gives a flat, cartoon-like appearance to 3D models. In cel shading, the lighting is quantized into a few discrete levels, which creates a more stylized look. This way, we can have more control over the colors while still maintaining a limited color palette.
Cel shading, together with the other techniques such as dithering and outlines, creates a very similar pixel art effect but with much more control over the individual colors.
This concludes the pixel art rendering pipeline.
3 Results
With the complete pipeline, we can create a wide array of pixel art scenes. But again, it still requires a lot of manual tweaking to get good results, e.g. choosing the right toon shader parameters for each mesh, setting the correct amount of dithering, adjusting the outline and highlight strengths, etc. I spent many hours to get it to look nice for each scene and I'm still not 100% satisfied with some of the results.
3.1 Dynamic Lighting and Animation
Rendering pixel art in real time allows for dynamic lighting and animation, which is one of the main advantages of this approach compared to traditional pixel art. Since I'm rendering from a 3D scene, I can easily change the lighting conditions and animate the objects in the scene.
Thanks to the orthographic projection, rotations look very crisp and maintain the pixel art style.
However, translations require some extra care to maintain a consistent look. Rendering at a low resolution combined with no interpolation whatsoever is an aliasing nightmare, so we need to make sure that the objects are always aligned to the pixel grid. Luckily, this is very easy to achieve, since we're using orthographic projection. First, compute the size of a pixel in world space, which is just the size of the orthographic view divided by the resolution. Then, round the position of each object to the nearest multiple of the pixel size. This avoids any aliasing artifacts and keeps the pixel art look consistent even during translations.
3.2 Comparisons
Here are some cool before/after comparisons I didn't know where else to put:
 Default Full-Resolution Scene
Pixel Art
Full-Resolution Cel Shaded Scene
Pixel Art
Default Full-Resolution Scene
Pixel Art
Full-Resolution Cel Shaded Scene
Pixel Art
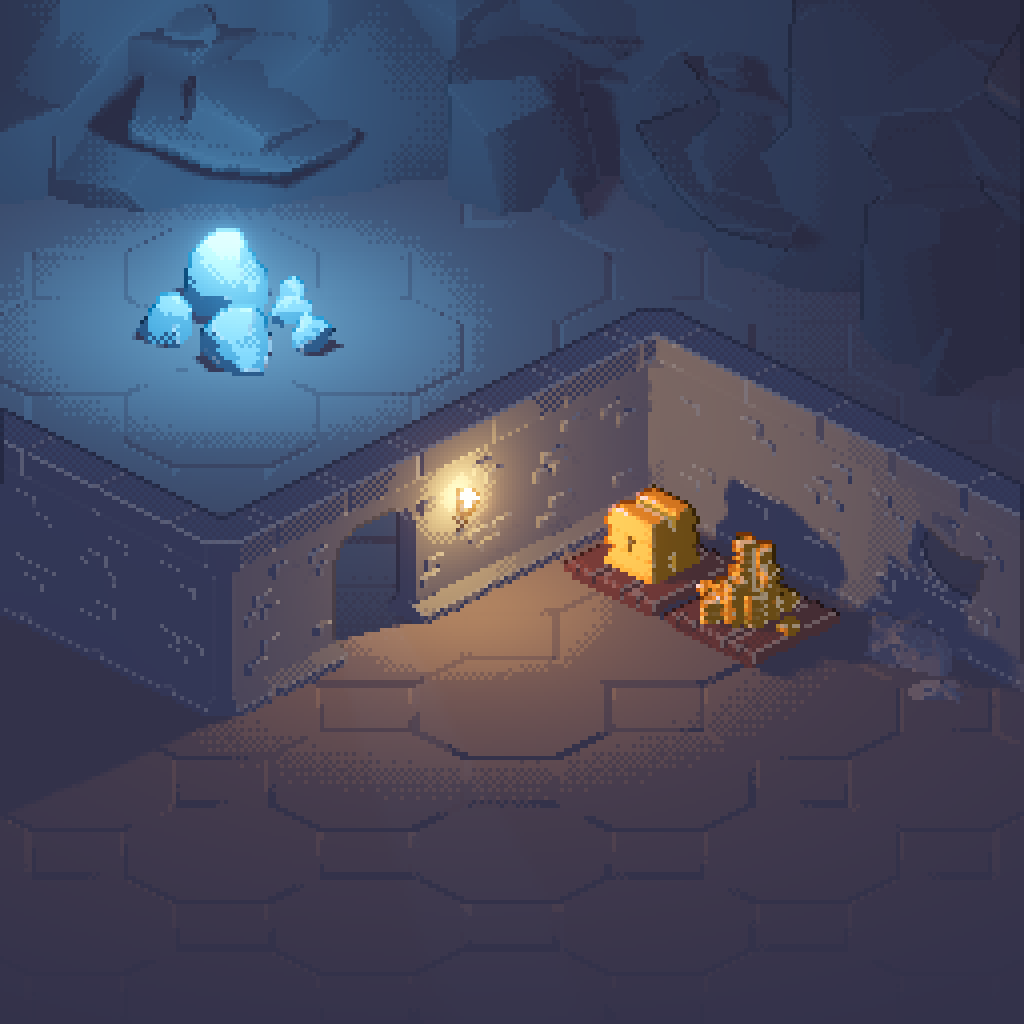
3.3 More Complex Scenes
I put together a dungeon scene to see how well this approach works on a more complex game-like scene. I think it looks pretty cool!
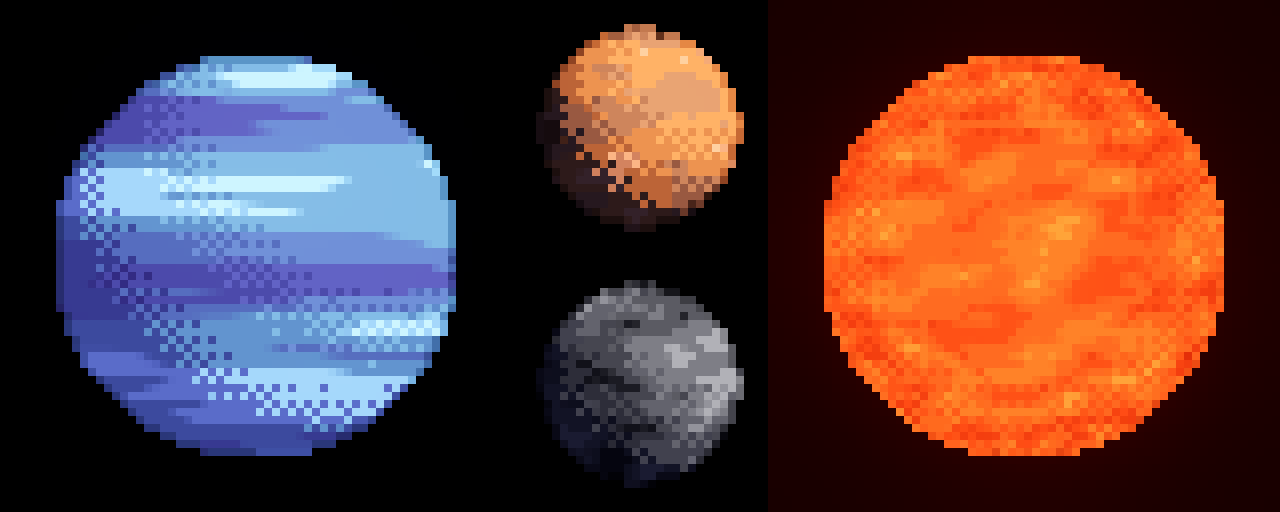
I also tried to make some planets with procedural noise textures, which look alright. Texture support is a bit hacky at this point and I definitely want to revisit that, but it's nice to see that it already produces decent results.
3D text looks pretty sick as well.
3.4 Particle Effects
I made a simple explosion effect by combining a few particle systems and an animated point light.
And another one with different colors and shapes.
It's not really a particle effect, but this rigid body simulation also looks pretty cool in pixel art style.
4 Conclusion
I'm pretty happy with how this project turned out. I definitely want to improve it further and build a little game on top of it, since it's already implemented in Godot.
Some things I want to add/improve:
- Even more control over individual colors, e.g. by using a color ramp to shade objects.
- Currently, outlines and highlights are applied on top of the dithered objects, making them appear dithered as well. It would be nice to have clean outlines and highlights that are not affected by dithering.
- Custom post processing effects. I used the deault Godot bloom here and there, but that creates smooth color gradients, which don't fit the pixel art style. Subtle bloom can look nice, but it would be interesting to explore custom post processing effects that are more tailored to the pixel art look.
- Rendering other types of objects such as foliage and water.
5 Acknowledgements
- My Godot setup is based on 3D Pixel Art Grass Demo by Dylearn
- I based my toon (cel) shader on this Flexible Toon Shader
- For the dungeon scene, I used assets from Kay Lousberg's Game Assets
Member of the Polyring webring